 |
| My LOVE is done!! |
Showing posts with label home decor. Show all posts
Showing posts with label home decor. Show all posts
Tuesday, January 17, 2012
All you need is LOVE
Happy New Year everyone!! Ah, I just wanted to share a quick little update about how I completed my yarn letter project. The "V" was bought, covered and now proudly sits displayed in my hallway. Moral of the story: At least start a project...you are more likely to finish it than if you never start at all. Amen!
Tuesday, December 20, 2011
L.O....E. Wait a minute....
I am blonde. I am constantly multitasking. I am sometimes preoccupied with other things than the task at hand. I am daydreaming about something much bigger than myself that is out there for me! I am getting older every single day. I am a woman. Whatever the reasons are, I am forgetting everything lately!! Anyway...the lesson for this blog is: if you at least start something, you are more likely to finish it than if you never start it at all.
Hmmmm, let me explain that whole first paragraph and introduce ya'll to some yarn art!! Let me take you back to last Friday. It was a rainy little day and I had nothing in the world to accomplish except some errands. Since we live in a smaller town, my errands consisted of an hour-long drive to the 'bigger' town down the road. I adore these days. I cherish my alone time on the way up there and just love looking around all day at some of my favorite stores.
I was in Hobby Lobby (sigh of contentment!) and I had been inspired recently to cover some chipboard letters with yarn. Standing in front of the letters, I was trying to think of what word would look good. "EAT" in the kitchen...hmm, no good...I don't need a reminder to do that. "ALEXANDER" in the hallway...hmm, too long of last name. "SLEEP" above our bed all cutesy-like....nah. "JOY" somewhere in my house....no, this wonderful word reminds me too much of someone I used to know named Joy. "LOVE"....this word can never be overdone. It's perfect! So, I grabbed my chipboard letters and then scooted over to the yarn aisle to buy four of my most favorite colors of blue and green to cover my letters.
I arrived home, got out my recently purchased supplies to start making my project. OH HEAVENS!!! In front of me lay an: L, O and E. I messed up and forgot my V. You can NOT have LOVE without the V!!! I went through the whole array of emotions in literally two seconds (from frustration to humor) and started to work. Part of me wanted to just wait until I had my "V" in hand, because I wanted a finished project. However, I knew that I had the time, energy and gusto to work on my little yarn letters right then, SO I DID.
Have I made it back up to Hobby Lobby yet? No. Did I put up the "LOE" in my hallway already? Yes. Did I have lots of people over to my house to see the "LOE" in my hallway? Ha, yes, I did! But, I figure that if I walk by it everyday, I won't forget to finish this very fun project. So, people, start something, even if you don't have all the stuff to finish it right there!!
Lastly, here's how you do this quick little masterpiece. Buy letters, cut them out yourselves, whatever you would like to do...then get some yarn and just tie a knot in the back to start it and then start wrapping. It takes a few minutes, but it's easy and oh so cute!!!
Good luck my friends and Merry Christmas!!!
Hmmmm, let me explain that whole first paragraph and introduce ya'll to some yarn art!! Let me take you back to last Friday. It was a rainy little day and I had nothing in the world to accomplish except some errands. Since we live in a smaller town, my errands consisted of an hour-long drive to the 'bigger' town down the road. I adore these days. I cherish my alone time on the way up there and just love looking around all day at some of my favorite stores.
I was in Hobby Lobby (sigh of contentment!) and I had been inspired recently to cover some chipboard letters with yarn. Standing in front of the letters, I was trying to think of what word would look good. "EAT" in the kitchen...hmm, no good...I don't need a reminder to do that. "ALEXANDER" in the hallway...hmm, too long of last name. "SLEEP" above our bed all cutesy-like....nah. "JOY" somewhere in my house....no, this wonderful word reminds me too much of someone I used to know named Joy. "LOVE"....this word can never be overdone. It's perfect! So, I grabbed my chipboard letters and then scooted over to the yarn aisle to buy four of my most favorite colors of blue and green to cover my letters.
I arrived home, got out my recently purchased supplies to start making my project. OH HEAVENS!!! In front of me lay an: L, O and E. I messed up and forgot my V. You can NOT have LOVE without the V!!! I went through the whole array of emotions in literally two seconds (from frustration to humor) and started to work. Part of me wanted to just wait until I had my "V" in hand, because I wanted a finished project. However, I knew that I had the time, energy and gusto to work on my little yarn letters right then, SO I DID.
Have I made it back up to Hobby Lobby yet? No. Did I put up the "LOE" in my hallway already? Yes. Did I have lots of people over to my house to see the "LOE" in my hallway? Ha, yes, I did! But, I figure that if I walk by it everyday, I won't forget to finish this very fun project. So, people, start something, even if you don't have all the stuff to finish it right there!!
Lastly, here's how you do this quick little masterpiece. Buy letters, cut them out yourselves, whatever you would like to do...then get some yarn and just tie a knot in the back to start it and then start wrapping. It takes a few minutes, but it's easy and oh so cute!!!
 |
| A closer look at these letters wrapped in yarn...sorry for the HORRIBLE lighting! |
 |
| I have the letters sitting on a small shelf in my hallway that is surrounded by pictures. The "V" will be a darker teal than the "L" and it will make a lovely little "LOVE." Until then, "LOE" your neighbors!! |
Good luck my friends and Merry Christmas!!!
Friday, December 9, 2011
Give me an "A"...or an "a"
Hello blogging world (all sevenish of my friends and family that I encourage to read my blog)....I have been MIA for a bit due to an abundance of projects taking all my time. I was actually going to wait a few more weeks before I started sharing all these ideas again, but I can't wait!! I have the cutest little idea that would be criminal for me NOT to share! AND, my sweet husband often times doesn't notice when I put something new up in the house (because it's an ongoing process that doesn't end)...HOWEVER, he noticed what I'm getting to share with you! This morning when he came to say bye to me at 4-something am, his words were, "I really like that thing you made in the hallway." Me, jumping up that he noticed, instantly awake "Really? What do you like about it?! I like it too...Ooooh, I'm glad you like it." Looking back now, I can see why maybe he doesn't compliment all my projects, ha! SORRY, I digress! Back to this oh-so-fun project!
So, I saw a picture recently of something similar to this (it's not my very own idea, sorry!), and LOVED it. They made a "k" out of all the same exact color of orange buttons and it was super cute. I realized that I should of course make an "a" for our awesomeness and our last name is Alexander...but when exploring my button collection yesterday, I realized all my buttons were different! So, all different buttons (which turned out fabulous I think) is what I used for this little project!!
How I did it: I had an old 8x10 frame that I no longer used, I covered it in batting and then fabric. They didn't have the exact type of fabric I wanted in my small little town, so I cut up an old shirt for the fabric! I got out my staple gun and went to work!! Once the fabric was secured, I just starting putting buttons in the shape of an a. You could draw it out beforehand if you desired, but I didn't. If you were really ambitious, you probably could actually sew any button on. Ummm,I used my handy dandy hot-glue gun! Once I glued them on, I got some white ribbon (I will probably just use solid color light teal ribbon when I buy some) and attached it to the back and hung it up with an over sized push-pin!!
Ahhhh! I just hung it up and just stared at it last night, feeling all creative! It's a quick project that is inexpensive (if you have the buttons). I always see jars of buttons at garage sales for cheap and I always buy those bad boys up! Anyway, I am back little blogging world....be prepared!!
 |
| Hanging up in our hallway for all to see. |
 |
| A close-up view of all my random buttons. |
 |
| My favorite thing about this button project is the texture of all these BUTTONS!!! |
Tuesday, September 27, 2011
Simple and Cheap...
Hello world...I have been MIA, because I have had some fun-crazy stuff happening lately....SO here I am!! Anyway, now to the blog: When living in an apartment (and NOT allowed to paint the walls), one must come up with creative ways to fill the wall space. It must be simple, cheap and most importantly fill a lot of this empty space on the wall!!!
Low and behold...the project below for under $20!! (the stuff on the wall...please ignore the stuff on the table).
I high-lighted this briefly before, but people have requested I give a quick how-to.
I bought six random size frames at my favorite local thrift store, went to Lowes and bought those itty bitty sample paints (I bought them in two colors, one light aqua and one dark aqua. They are behind the paint counter and around $2 a piece) and then I bought four peacock feathers from a craft store. I took the glass out of the frames, sanded them down lightly (so the paint sticks better), then painted them random shades between my light aqua and dark aqua. I hung them on the wall (a level is key here, unless you have a perfect eye!)...and then added the peacock feathers afterwards...I just added them by taping them to the back edge of the frames. KEY: I laid this little collage out on the floor first to figure out where I wanted each frame to save my wall from multiple holes.
Lastly, you can use anything...not just peacock feathers.
Good luck and hopefully you have a bare little wall, this might be an idea for you!!
 |
| This is in my dinning room and adds the perfect detail to an otherwise blank wall. |
Wednesday, August 31, 2011
Mountain artwork!!
I went up to the mountains last week for a family reunion...and it was fabulous. Literally, AMAZING!!! My extended family is about as amazing as they come. They are kind, loving, hilarious, encouraging and just good at life!! And, it was a nice little creative escape. I came back feeling refreshed and full of good ideas! (my family is amazingly creative as well, so always good to be inspired by them).
Anyway, I just want to quickly show you the most amazing piece of artwork EVER!!! The great one (my mom) went up to this mountain oasis this last winter to help my uncle and aunt decorate their home. When she was up there, I talked to her on the phone and she was sharing with me this artwork that she created. I listened, but honestly, didn't 'get it.' It sounded like a big blob on the wall. As she described it more and more, the more confused I became. I completely forgot about this artwork until this weekend. I was looking around at my awesome auntie's mountain home and saw this art on the wall...complimented them and she informed me they were made by my mom. Am I surprised? No!!! Anyway, completely amazing!!!
She got pieces of plywood, covered them in faux-leather pieces. Put little mosaic pieces of tile and cut part of the sides away to make it look like natural ('riverish'), added grout...then went and chopped down trees (not kidding) and tied them to the artwork. Look below to see amazingness!!
And, if that weren't cool enough, look what is beyond the artwork (in the last picture). SERIOUSLY, could this get any cooler?!
 |
| This huge incredible artwork just make this hall-way something special. |


 |
| AND...OH MY AMAZING!!!! Behind one of the pieces, is a hidden room. It's a door!! WOW! |
Thursday, August 18, 2011
DIY...and DIY quickly!
Okay, I admit it...I have a problem. I start things and have trouble finishing them. For instance, I have been working on the same oil painting for almost a year now. UGH! I like details and enjoy even more taking my time working on details. I am able to do this, because let's face it, I have nothing else to do with my time. BUT, just because you have the time to work FOREVER on a DIY-project doesn't always mean you have to. It's often times the most rewarding to have a project done quickly to show off the creation you just made!! Let me share with you a very quick and AH-amazing paint project!
If you haven't noticed, I am still highlighting some of my mom's projects. I have stacks of things of my own to share with the world, but thought her ideas are just too great to wait!! In the basement of my parent's home is where you could almost always find someone. It's a great hangout place! It has a big screen, recliner chairs in a row, a fireplace and a pool table. It's the place to be in this amazing house!!
Along the walls sits five rectangular pieces of black metal. (You could also use canvas) From afar, you see lines of fall-foliage-colored trees. Up close, you see paint dripping and the brush-blots. I LOVE IT!!!! What the great one did: lined up the canvas/metal in a straight row, stood them tilted on the ground (so the paint would drip), put a little dab of paint on each one so the dripping would begin, then just blotted the bristles of the brush to create the tops of the trees. See below. It's a stunning piece that sits along the wall of the basement. AND, the very best thing about this project is: it's fast!!!


 |
| The view from across the room of this amazing DIY artwork! |
Wednesday, August 17, 2011
Mirror, Mirror, on the...furniture?!
First and foremost, I apologize for the quality of pictures that you will see in this entry...as well as the possible messiness that is in the background. I was rushing taking these pictures and did not take the time they deserved. Sorries!!
So, "Shabby Chic" is all the rage right now. It's adorable, but it seems like EVERYONE is doing it. So...you have an old piece of furniture that you want to redo and you are not really a shabby chic type person. What is one to do!? One possible solution is to add mirrors!
I am a huge fan of finding old furniture and sanding it down and repainting it. I have painted my tables apple green, turquoise, white and even the predictable but solid brown. I have not gotten brave enough to paint the same piece of furniture multiple colors...it's still too much for me. At least that's what I thought until I came upon this little dresser in my mom's room. Then, on top of the different colors, she goes one step further and adds mirrors. When described, it seems like too much, but honestly, it works...and I LOVE IT!
 |
| A variety of colors and different sizes of mirrors makes this dresser truly unique! |
Across the room from the bright dresser sits a small vanity desk. She painted this silver, added fun knobs on the front and then mosaiced part of it in mirrors!!! Then, she added a cute little fluffy bench chair underneath to complete the look. I absolutely ADORE this little table. Silver is a color that can go with nearly anything. Add a little silver paint and some mirrors and you BAM, you have a fun little accent piece to add to almost any room.


Thursday, July 14, 2011
Back to the Most Creative House in the World...
I have taken a few days off from sharing ideas from my parent's house. I didn't want to overwhelm you with all the good home-decorating ideas at once, so I am spreading the creativity out! Now, back to the home:
I am high-lighting something very small today, but it warms my heart like nothing else...it's seriously amazing! Please glance at the picture below and what catches your eye most?

Yes, you might say the coke bottle (I took a picture in the middle of us eating dinner when I was visiting, so pardon any mess you see...It's my fault!). Or you might say the tile wall that she helped design herself. Or you might say the fresh looking cabinets, which she redid and painted herself. You might even say the turquoise/aqua painted back splashes in the openings in the cabinets. But, my focus right now is of the rectangle art at the top of the wall. I am so mad at myself for not taking a picture of this same exact room when the lights were off, because it would just blow your mind...SERIOUSLY!
Here is a close-up:

You might be thinking, what does that say? It says "Love always protects." Around the top of my parent's kitchen on pieces of leather (left-over from the leather wall in the bedroom, I am sure) are embroidered verses from 1 Corinthians 13...and they are embroidered in GLOW IN THE DARK THREAD!! Oh my amazing! We always need reminders of what the Bible says...especially when it is the darkest. Even if these didn't glow in the dark, they would still be fabulous...but they DO, so wowzers!
Morals of this creative little lesson: 1. Put God's word everywhere. I mean, really, can you ever go wrong with that? 2. Save your left-overs from other projects, because you will find another use for them, I promise! 3. If there is a spot on the wall that is bare, even if it's small, you can put something creative and unique there!
Tuesday, July 5, 2011
Leather Walls? Yes Please!
You have an entire wall. You don't want to paint AGAIN. You don't want to buy expensive wall art that you don't really like anyways. You definitely don't want to leave it white.
What is a person to do? Leather!?!?!
On one of my parent's bedroom's walls, the entire wall is covered with leather. She went to a fabric store, bought a leather bolt. She didn't want the fabric to overlap in an unattractive way, so she bought pieces of wood trim, painted it silver and then added/mosaiced mini-mirrors to the center of each piece of wood. She then added silver studs throughout the leather to keep it attached to the wall. Oh, I just love it! When described, it sounds 'cowboy.' However, when you see it, it just looks classy, original and all sorts of good.
Their room is done in brown, silver and red and it is FABULOUS!
Below are some pictures of this leather-covered wall!
 |
| A view of the leather wall. |
 |
| A close-up view of this leather wall with the silver trim dividers covered in mirrors! Ah, how creative! |
Wednesday, June 29, 2011
Ah, the joys of looking up!
One of my favorite things in the world is seeing something unique in a completely unexpected place. I love when someone takes the time to beautify an area that usually gets ignored! A perfect example of this would be my mom's 'craft room.' Yes, she has an entire room dedicated to her projects. Be jealous ladies. She has recently taken over the garage with powertools as well (not kidding!) Anyway, this room is done in black and white and it's great!!!!
The greatness of living in an older home is you can do all sorts of things without fearing ruining the value of the home! The basement of this house has those older ceilings with the squares. What she took the time to do to her ceiling is inspiring! Since she couldn't rip the ceiling down (I think she inquired if it was possible), she decided to make it as visually appealing as possible, with keeping true to her inner funk of course. Alas, her ceiling:
 |
| Just a little something different to add some flair to this space! |
 |
| This is 'HER' room, filled with projects she is always working on, so it is extremely fitting that even the ceiling is one of her completed unique projects! |
Just sharing some ideas!!
Monday, June 27, 2011
A spunk of a thing!

What do you see when you look at this thing above? A funky flower?! Some really prickly little thing? A sun? If I were to see these at a store, I would have to think really hard to find a place for this guy in my home (But, don't get me wrong, I LOVE this spunk of a thing!!).
I am yet again writing about my parent's home (I warned you!)...and this little guy...and how my mom used this small piece of art in such a cute way!!! I was inspired. If you recall a few entries back, I told ya'll about the new amazing orange retro room. On one of the walls, sits five of these little spunks....and four 'X's. Hmmm, what could this be?! TIC-TAC-TOE!!!
How did she do it?
She saw these amazing little spunks (my official name for them) at a store and bought them, thinking that she would create an over-sized tic-tac-toe game on the wall. To complete this game, she bought cardboard cutouts of 'X's and then bought scrapbook paper to cover them. She finished off the game board with thin pieces of wood that made the lines. She painted them brown, put them together and there you go....project complete!!!
The moral of the story?! If see something that is interesting, unique and just all sorts of cool at a store....BUY IT! You may not have the place for it yet, or even the perfect idea for it yet...but you will....it'll come!! And if the idea doesn't come, I can give you my mom's number! :)


Wednesday, June 22, 2011
Not your Grandma's China Cabinet...
**Disclaimer: I am uncertain if the word "china" in the phrase "China cabinet" is supposed to be capitalized or not. Therefore, I used an uppercase about half the time, so at least I'll be right some of the time. I am sorry if I have offended the Chinese or anyone else with my lack of proper capitalization.
Some of my most favorite things to look for at flea markets and antique stores are china cabinets. The reason for this is probably because I have an unnatural love for dishes! LOVE THEM!!! I already own four complete sets of dishes and I am already to starting to collect a fifth (an INCREDIBLE Kelley green antique glass dish set for Christmas....these dishes make me happy every time I see them!!!)....I digress. China cabinets, they are amazing! I bought one a few months ago and am not satisfied with the one coat of paint I put on it. I have constantly thinking about how I am going to make it my own....while nothing has come to me yet, this is a project on the top of my to-do list.
However, when visiting the Motherland, I was reminded of what makes the china cabinet so amazing. Both of my sweet grandmas own very lovely china cabinets. You know the China cabinets I am talking about here: An oak wood (or some other very nice wood) with glass pane windows so you can peek in at their very gorgeous china and crystal. While these China cabinets are very nice, they are traditional and lack the flair that I wish to bring to my own china cabinet someday. BUT, the woman that can bring flair to anything is Tami Trivitt, my mom.
Let me tell you a little bit about her China cabinet. She painted it black (I know what you are thinking....BLACK?! Is she crazy?!), mosaic-ed the back of it with light-aqua-colored translucent mosaic tiles, knocked out the wood shelves of it and replaced them with glass shelves instead, painted the inside sides a light aqua color and then added little jewels on them. Then, she had my grandpa (yes, my entire family is incredibly creative) make lead (stained) glass cabinet doors for the front. To top it all off, she drilled a hole in the back of cabinet, so she could add a light at the top of the cabinet. "OH MY GOODNESS, she has destroyed this piece of wood!!!!" That was my initial thought when she told me about it via phone before I actually saw it in person.
However, what my mom created is one of my favorite pieces of re-done furniture that I have ever seen. I absolutely LOVE it. This amazing 'piece of wood' is not your grandma's china cabinet. :) Every time I see a china cabinet in the antique stores, I try to see it's potential as something that could someday look like this!
 |
| THE China Cabinet! |
 |
| I have learned that the most important part of decorating is not WHAT you have, but HOW you arrange it. I love the way my mom stacks things here and there in her china cabinet. Design everywhere!!! |
 |
| An up-close view of the mosaic backsplash of the China cabinet...there are even little added jewels here and there, LOVE IT. |
 |
| The inside corner of the cabinet....little details everywhere! |
Tissue-Paper?!?
So, when one wants something completely outside of the box, one has to think completely outside of the box. My mom (the creative genius) wanted textured walls...not faux-textured walls, but the real thing. She used tissue paper...Yep, tissue paper! She put a little paint on the wall, then laid the tissue paper on top. Then, she later painted over it.
I wish I would have taken more pictures of this, but I forgot. If you look at the wall here, you will notice an awesome tissue-paper texture...because it actually IS tissue paper underneath there. I LOVE this inexpensive way to get a unique look for the wall! Has she figured out what to do if she no longer wants this tissue-paper look?! Hmmm, knowing her, she'll probably just tear down the whole wall. :)
I wish I would have taken more pictures of this, but I forgot. If you look at the wall here, you will notice an awesome tissue-paper texture...because it actually IS tissue paper underneath there. I LOVE this inexpensive way to get a unique look for the wall! Has she figured out what to do if she no longer wants this tissue-paper look?! Hmmm, knowing her, she'll probably just tear down the whole wall. :)
 |
| I was actually taking picture of this 'home-made' art in these pictures, but please notice the TISSUE-PAPER textured wall in the background. Amazing!!! |
Tuesday, June 21, 2011
Orange you glad....
As I mentioned earlier, my parent's home is crazy creative and full of color; Simply put, I LOVE IT! There is an office upstairs that serves as an extra bed when people are visiting. It used to be done in 'man colors,' but to my pleasant surprise, it is now done in ORANGE and it is FABULOUS! Did my mom make the headboard on the bed? YES. Did she also make the curtains? YES. Did she make some of the pillows? YES. However, in these next pictures, I would like the world to focus on these hanging lanterns. They are just wonderful and I am going to find a place in my home to put something similar to this.
What she did: She bought strips of leather, sewed them together to create the cord which the lantern is hung. She attached hooks in the ceiling to hang the leather from. She found the lanterns at a local store (only color they had was orange...of course!) and then placed in them white candles for this amazing look! If you find lanterns you want, spray paint can be used to get them the color you want! I am contemplating how I can re-arrange my bedrooms to add these hanging lanterns to my own home. White lanterns with some bright candles would also be amazing I think!
Below are some pictures of these amazing lanterns that added some originality to this amazing-retro-colored room!!!
![]()
![]()
What she did: She bought strips of leather, sewed them together to create the cord which the lantern is hung. She attached hooks in the ceiling to hang the leather from. She found the lanterns at a local store (only color they had was orange...of course!) and then placed in them white candles for this amazing look! If you find lanterns you want, spray paint can be used to get them the color you want! I am contemplating how I can re-arrange my bedrooms to add these hanging lanterns to my own home. White lanterns with some bright candles would also be amazing I think!
Below are some pictures of these amazing lanterns that added some originality to this amazing-retro-colored room!!!


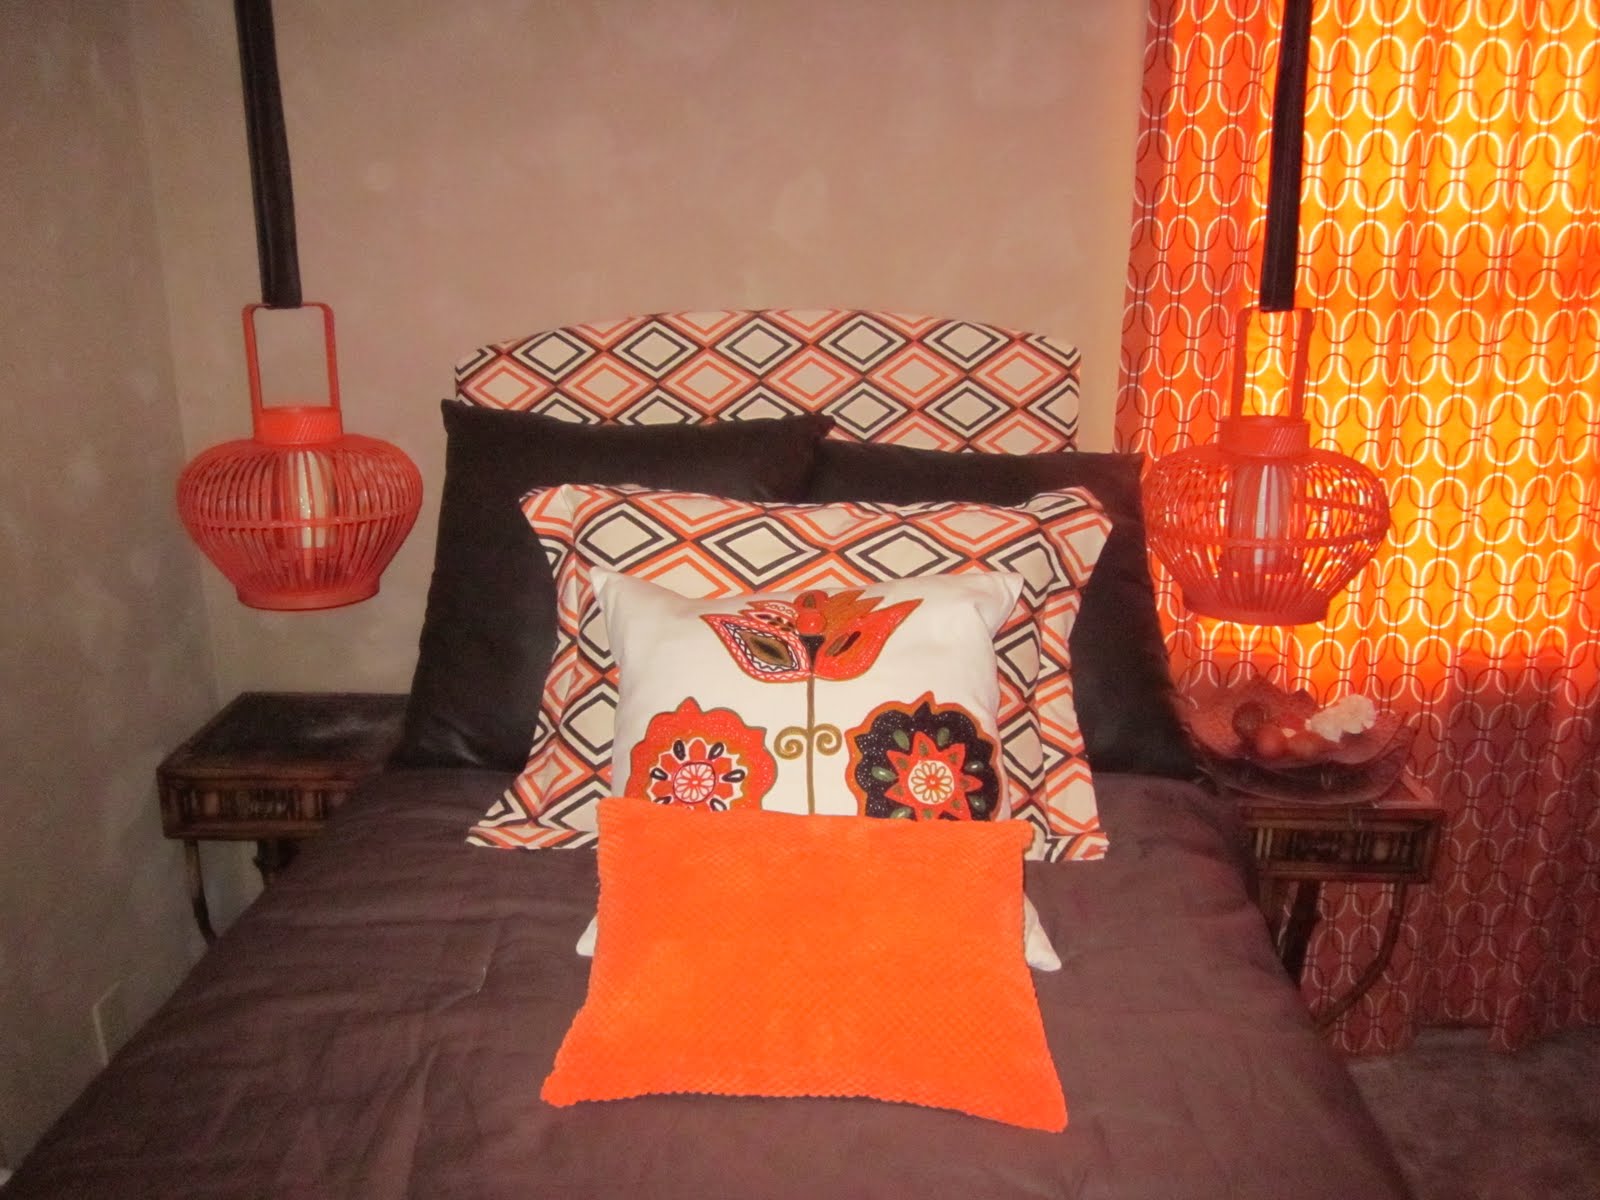 |
| I LOVE THIS! These lanterns are just AMAZING!!!! |
Prepare yourselves!!
Okay, before I get started here, please (all three readers....I've counted three being my mom, sister and husband) prepare yourselves for the next fifteen or so blog-entries to be about my parent's home. WOWZERS! I went back to home sweet home this last week and brought along my camera in hopes of capturing some images of my mother's creativity, so I can share it with the world.
The woman did not disappoint!!! To my pleasure (but not my surprise), one room and one entire backyard had been redone (it had been at least two months since I had last visited). So, please blog-readers prepare yourself to be truly inspired in my next few blog entries about the creativity this woman possesses! From leather walls, mirrored dressers, antique cabinets, glow-in-the-dark-everything to tissue-paper walls; it will inspire I promise!
I am officially committing to making more regular entries, so watch out! Also, after I rave about my mom's D-I-Y amazingness for a few weeks, I will show off the newest creation of my own. Prepare yourself world!!
Thursday, May 26, 2011
One? Not enough!!!
Okay, so I am not allowed to paint my walls in my apartment!! Ahhhh! Not that I don't appreciate the light sand-brown color that they are painted (believe me, it could be so much worse), but I like a little more COLOR in my life! Therefore, I am forced to hang things on my walls. I hope my landlord doesn't read my blog....doubtful, since only my mom and sister read...and that's when I pester them to....but, back to my landlord. We were discouraged not to put any holes in our walls, but I can't leave them as be. I just counted and I have put 104 holes in my walls (I have 52 hanging objects in my wee little apartment)...and I haven't even finished my bedroom yet.......eeeeeeeeeeek! It's gonna be quite the day when we must putty over all these little holes.
I think my biggest hindrance when hanging things is I hate to leave an item by itself. When all by itself, I think an object probably gets lonely...therefore, I am always hanging groups of things together. No rhyme or reason to my group hanging...I just think it looks more enticing to my eye! I know it's not a new idea in any way, but just wanted to share some clusters of objects that adorn my walls to give the everyday-man some ideas.
I think my biggest hindrance when hanging things is I hate to leave an item by itself. When all by itself, I think an object probably gets lonely...therefore, I am always hanging groups of things together. No rhyme or reason to my group hanging...I just think it looks more enticing to my eye! I know it's not a new idea in any way, but just wanted to share some clusters of objects that adorn my walls to give the everyday-man some ideas.
|
| I just couldn't find anymore pictures to put in frames. So, I went to a thrift shop, bought some old frames, painted them up, stuck some random peacock feathers in and hung them up in the corner of the dinning room! |
 |
| Can't go wrong with hanging things in threes. In descending size order, I hung some fun wedding reception shots. To add a little somethin-somethin at the top, I hung the top one from ribbon. |
 |
| Again, with my threes. |
 |
| Oh my heavens, you'd think I'm obsessed with the sconces! |
 |
| They are squares, they are boring, but I like em! |
 |
| A collage is the perfect way to hang all of Matt's military stuff! |
Subscribe to:
Posts (Atom)