Showing posts with label flowers. Show all posts

Tuesday, September 13, 2011

My sister's favorite thing...

I've highlighted my dear sweet sister's creativity before, but here is yet another example of her being creative! A little background that seems necessary on my sister. She's obsessed with pens. YES, pens! It seems odd to the average person, but if you knew how much this girl writes, grades college papers, doodles...you could then maybe understand her love for the pen. In her house, she has an entire drawer (not a little drawer mind you) saved for her pens. So, you get the picture, she likes pens.

NOW while I am on the subject of pens...I am sure that almost all of you have seen those pens with big flowers or sometimes a random spoon on them at banks, grocery stores, etc. It took me a while to figure why these were necessary, but it's so people won't keep taking these pens that belong to these businesses. My sister, loving pens as she does, clearly took note of this and thought of this brilliant idea!!

My parents never have pens laying around then they need one (to take a message when someone calls, etc), so my sister made them an adorable little container of flowers that matches their kitchen PERFECTLY that are actually pens!!! YAY! What a perfect little idea that I wanted to share.
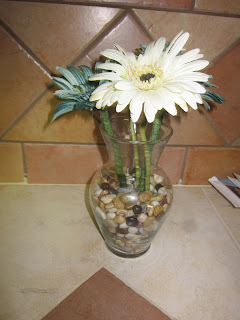
You notice a cute little pot of flowers on the counter...never do you think it's actually pens!! WOW! LOVE IT!!

Best thing about these flower-pens is they are very cute flowers, not cheesy lookin ones!

I just LOVE it!!

Thursday, September 1, 2011

Handmade gifts. From: Shena


For my mom's birthday a couple weeks ago, I made her a handmade frame. I know what you are thinking, does your poor family get anything actually bought from you?! Ummmm, yes, they do! HOWEVER, I like to make them things!

AND, as you may or may not know, I have a thing for flowers. No matter what type of project I am working on, I always try to add a flower to make it more 'me.' A few months ago, I saw a 'how-to' on making fabric flowers by cutting circles out of fabric and then burning the edges (silk-based fabric), so of course I tried this. I tweaked this process a little bit and I absolutely LOVE what I came up with.

Anyway, I only took a picture of this frame on my horrible little cell-phone camera, so pardon the HORRIBLE quality of the picture. You can get the idea though. Soon (October), me and two of my good friends are going to 'teach' a class to a bunch of Air Force spouses about making these frames, so I will whip up many more examples and have some much better pictures.

What I did: bought a wood frame from Wal-Mart (for 2.97...but Hobby Lobby also has wood frames for 1.00...however, I live an hour from Hobby Lobby, so you see my dilemna!), glued a piece of scrapbook 12x12 paper on to the frame...cut to fit, sanded down the edges to give it a worn look, then stained the edged with my dauber (see previous entry for my going-ons about the dauber), then attached these FABULOUS silked burned flowers I made and added a few little pearls in the flowers and in the corners of the frame....and waaalaaa: homemade birthday present frame done!!!


You can do all sorts of fun things with these cheap frames to personalize them. Hope this gives you some ideas!!

Monday, May 9, 2011

Sometimes less is more...

I do believe I have had an obsession with flowers since I was a wee-lass. As a child, my room was covered in cut-outs from magazines of flowers (one whole wall was covered). I was always amazed at the vast variety and colors which was the flower. Getting older, I worked at a flower nursery, learning everything you can imagine about garden plants. Then, my job as a 'production coordinator' (aka: party designer) took my love of flowers to a whole new level! Before you even see them, the most pleasant smell greets you...then, once you enter a room filled with the most incredible colored flowers in the most creative arrangements, WOW! Flowers: they do it for me.

When the budget is limitless, it is VERY easy to make the room look amazing, as one can fill it up with every flower imaginable. However, when one's budget is much smaller and still desiring a look with fresh flowers, creativity must reign supreme. I just wanted to share some ways in which I have used fresh flowers in a very affordable way....using very few flowers to make a big impact!!!

Using glass containers, just add water and throw one or more flowers in there for an AMAZING effect!

This centerpiece is almost free! Gather sticks from the yard, spray paint them white (or any color), then add a few fresh flowers for a spot of wow-color. Can be a glass vase or any container!

Swirl flowers for a fuller look, using a smaller vase.

VERY cheap centerpiece. Use a prop for your focal point and then add a spray of flowers around for a very fun look...it always works well if you use some bright ribbon as well!

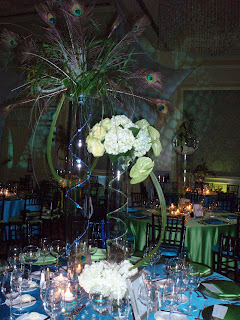
Very few flowers are used here for a very big look. Most important thing for any centerpiece involving a lot of glassware is making sure glass is clean! If using gloves to handle, make sure they are powder-free!


Adding flowers to manzanita branches, with hanging crystals and candles is a gorgeous centerpiece that can be used again and again!

Again, flowers and some water. Be gentle when bending stems of lillies and do it repeatedly and slowly!
Well, these flowers are about expensive as they come, but oh do they smell FABULOUS! You can always use some gerber daisies or dalias for similar look with floating candles.

If you want a pop of fresh flowers to your tables, hang any flower with a touch of hanging amaranthus for a great look!

Attach a fresh flower or two to an existing item (such as a lantern) for a great centerpiece.

Adding flowers in the napkins can get expensive, but if you have access to fresh flowers for free, this makes such a special added detail to any party!
Stack flowers in a funky, unexpected way for a centerpiece!

Button mums (very cost effective) can be made into a ball for a unique and oh-so-neat look!

Thursday, May 5, 2011

The Art of Quilling

Many people scrapbook (which don't get me wrong, I LOVE) and compromise paper in all sorts of interesting ways. They tear it, fold it, cut it, stain it...but my most favorite thing to do with paper is BEND IT! I love to quill! Not a typo here...not quilt, but quill.

I discovered the art of quilling when I was going through old things of my mom's. She had her old marriage announcement framed with these beautiful flowers (made of bended/folded paper) around it. It was breath-taking. I knew I HAD to learn how to do that! I found out who made this for her and called this amazing woman up. I took quilling 'lessons' from this lady and I learned how to do this amazing paper-bending-technique.

If you are not familiar with quilling, it is the art of taking tall, skinny (about 1/8 in. wide by 11 in. tall) lengths of paper, wrapping them around a needle and then bending them in the desired shapes you want. It's a long process, but the look is positively unique and something worth the time.

This is the slotted needle which you wrap paper around to create beautiful creations.


When making our wedding reception invitations, I decided to quill little flowers on all of them. About 100 invitations in, I realized there might have been an easier idea.

I am a complete ammature when it comes to quilling. An older lady (who taught me this art) makes the most AMAZING quilling creations I have ever seen. She is truly incredible. If you've never tried to quill and have extra time on your hands, you should try this very adorable and affordable hobby!!


Tightly quilled oranges made by a friend of mine. AH-AMAZING!

A little quilled flower in the corner of our reception invitation.

The top of our invitations...just a row of quilled flowers.


Wednesday, May 4, 2011

Little beads make beautiful things!!!

Years ago, I was watching a girlie movie and I saw the most beautiful detailed flower in a woman's hair. I paused the movie and carefully inspected this hair-piece and discovered it was a flower made out of itty-bitty beads put together some how and made into flower. OH MY!! I was going to have to learn how to do this!! I researched as much as I could about the elusive beaded flower. Very few resources could be found. I finally found this bead-shop in the middle of South Florida that carried one book about French beaded-flowers. I bought it, bought every color seed bead and more wire than you can imagine.

It's really a lost art...or rather, it's an art that was never really found, due to the amount of time and detail that each little beaded-flower requires. I have been making these flowers for years now and nothing is more fun than putting together one bead on a piece of wire at a time, creating a single petal and then eventually putting them all together for a beaded-flower-masterpiece.

The flowers in my hair on my wedding day were not real, but instead I made them out of unique crystal beads. The napkin-rings around my table at the holidays are beaded flowers made into a tiger-lilly and a poinsettia. The arrangements of flowers I put around my house from time to time will never wilt, because they are made out of beads.

Besides the amount of time these take to make, the only other real negative is the mess they leave behind! My husband will find these little beads everywhere after I have been working on flowers. I am constantly struggling to find more time to work on beaded flowers, because they are simply beautiful! Here are some I have created. I will make a picture tutorial sometime in the future for all these beauts!

Just a bundle of random beaded flowers I've made.

As well as flowers, bees and butterflies can be made as well!