Wednesday, August 31, 2011

Mountain artwork!!

I went up to the mountains last week for a family reunion...and it was fabulous. Literally, AMAZING!!! My extended family is about as amazing as they come. They are kind, loving, hilarious, encouraging and just good at life!! And, it was a nice little creative escape. I came back feeling refreshed and full of good ideas! (my family is amazingly creative as well, so always good to be inspired by them).

Anyway, I just want to quickly show you the most amazing piece of artwork EVER!!! The great one (my mom) went up to this mountain oasis this last winter to help my uncle and aunt decorate their home. When she was up there, I talked to her on the phone and she was sharing with me this artwork that she created. I listened, but honestly, didn't 'get it.' It sounded like a big blob on the wall. As she described it more and more, the more confused I became. I completely forgot about this artwork until this weekend. I was looking around at my awesome auntie's mountain home and saw this art on the wall...complimented them and she informed me they were made by my mom. Am I surprised? No!!! Anyway, completely amazing!!!

She got pieces of plywood, covered them in faux-leather pieces. Put little mosaic pieces of tile and cut part of the sides away to make it look like natural ('riverish'), added grout...then went and chopped down trees (not kidding) and tied them to the artwork. Look below to see amazingness!!

And, if that weren't cool enough, look what is beyond the artwork (in the last picture). SERIOUSLY, could this get any cooler?!


This huge incredible artwork just make this hall-way something special.


AND...OH MY AMAZING!!!! Behind one of the pieces, is a hidden room. It's a door!! WOW!

Tuesday, August 23, 2011

No thank you, I'll make that myself!

Have you ever walked into a store and absolutely loved something? I mean, you see it across the store and ahhh, your heart skips a beat...you just know that that object is meant to be in your home!! THEN, you see the price tag...and the love for this used-to-be-amazing-object vanishes and you can't believe the nerve that someone would actually charge that much for something! Yep, I have been there! I always say to myself, "NOOO thank yoooou, I will be making that myself!" By the time I actually purchase all the equipment and tools to make these home-made objects, it probably ends up costing the same, but it's the concept!

Anyway, back a few years ago, I spent a good solid week in my hometown, doing absolutely nothing but helping mom with her projects. It was the perfect therapy for me! She had ideas, I had ideas...but mainly she had the ideas and I had the labor! She wanted to replace the shutters on the outside of her house. We went to one of my favorite stores (Lowes....don't judge me, the store is AMAZING) and looked at shutters...whew, EXPENSIVE! So, we decided with authority and confidence that we could make em...so that's what we did.

We bought pieces of wood, cut them to the size she wanted (they could do that for you at Lowes, but she has her own power saw, so she did it herself...obviously), painted them the perfect color of grey-brown and then attached these awesome over-sized hinges that she had bought...then placed them beside the windows for some picture-perfect shutters! Every time I am lucky enough to go back to my home sweet hometown, I see these amazing shutters and feel a sense of pride because we made that ourselves!


Monday, August 22, 2011

Tag, you're it.

Ha, I am still giggling on the inside of my creative little title of this entry. So, I'm going to talk about tags today. I like them. I love how you can go into a store and right beside the gift-wrapping is all sorts of little matching tags. Ah, glorious! But, if I ever see something in a store that I like...well, you best be believing that I think I can create it! So, this little entry is about some homemade tags...well, kinda. Some of my friends here in Mississippi have been inside my 'craft closet' and seen my boxes and boxes of home-made tags I have made, just waiting to go on presents someday. I have issues people! I create things by the masses...seriously! I don't just make one really cute tag, I make thirty of the same one. People think I am kidding, I am not. If you have ever read "my intro" to this blog, you will understand, that working with my hands is my therapy...so if I'm in a 'mood,' I generally can be found hunched over working on something. And, then I go overboard and make thirty of the same thing. SO...wow, long rabbit-trail there, but my point is: this entry is NOT about all those tags, but one other tag in particular. Whew!

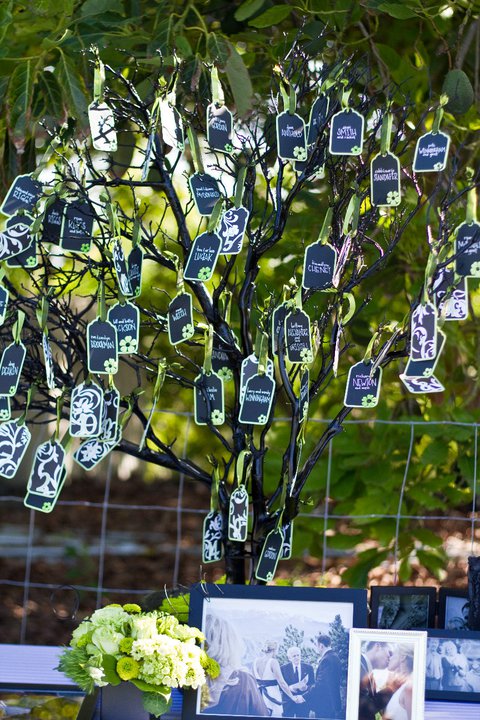
Anyway, for me and my favorite's wedding reception, we had the task of assigning people to particular tables for dinner. For all those who have had weddings, I am sure this is a task you might not have relished. I LOVED IT! I could not wait to make these fun little place cards and tell people where they were to sit....maybe it's the bossiness in me! Either way, I decided to make our place-cards into 'place-tags.' Our colors were black, white and that fun little apple green, so that is the colors I used. What should tags be hung from? Well, a home-made mini-tree of course!

What I did and how I did it: I bought some manzinta branches at a local whole-sale flower shop, zip-tied them together (zip-ties are AMAZING...and if you have never used them, I insist that you try someday) and spray painted them black. Bought a little bucket-of-a-thing to put them in, mixed up some concrete to pour in the bucket and hold the branches into place. I then covered the concrete up with some moss. As for the tags: I cut them out to the size I wanted, cut out the numbers as well (by cut, I mean use the amazing cricut that cuts anything I want for me), bought a white-pen so I could write on the black tag and there you go! Then, I got green and black sheer ribbon to hang them with and waaaLaaa, place-tags done! I am sure the pictures will explain this MUCH better than I am attempting to.

I don't know if I will ever throw a party in the future that will require place-cards, but if so, I will have my tag idea ready to go!!


A far-away view of the tree with the 'place-tags' hanging from it. I will try to find a better picture!

An up-close view of the tags.

And, mad props go to my sweet, sweet husband for assisting me with the creation of the tree...he doesn't always see my vision when I explain it, but he's always there supporting it!

Thursday, August 18, 2011

DIY...and DIY quickly!

Okay, I admit it...I have a problem. I start things and have trouble finishing them. For instance, I have been working on the same oil painting for almost a year now. UGH! I like details and enjoy even more taking my time working on details. I am able to do this, because let's face it, I have nothing else to do with my time. BUT, just because you have the time to work FOREVER on a DIY-project doesn't always mean you have to. It's often times the most rewarding to have a project done quickly to show off the creation you just made!! Let me share with you a very quick and AH-amazing paint project!

If you haven't noticed, I am still highlighting some of my mom's projects. I have stacks of things of my own to share with the world, but thought her ideas are just too great to wait!! In the basement of my parent's home is where you could almost always find someone. It's a great hangout place! It has a big screen, recliner chairs in a row, a fireplace and a pool table. It's the place to be in this amazing house!!

Along the walls sits five rectangular pieces of black metal. (You could also use canvas) From afar, you see lines of fall-foliage-colored trees. Up close, you see paint dripping and the brush-blots. I LOVE IT!!!! What the great one did: lined up the canvas/metal in a straight row, stood them tilted on the ground (so the paint would drip), put a little dab of paint on each one so the dripping would begin, then just blotted the bristles of the brush to create the tops of the trees. See below. It's a stunning piece that sits along the wall of the basement. AND, the very best thing about this project is: it's fast!!!


The view from across the room of this amazing DIY artwork!

Wednesday, August 17, 2011

Mirror, Mirror, on the...furniture?!

First and foremost, I apologize for the quality of pictures that you will see in this entry...as well as the possible messiness that is in the background. I was rushing taking these pictures and did not take the time they deserved. Sorries!!

So, "Shabby Chic" is all the rage right now. It's adorable, but it seems like EVERYONE is doing it. So...you have an old piece of furniture that you want to redo and you are not really a shabby chic type person. What is one to do!? One possible solution is to add mirrors!

I am a huge fan of finding old furniture and sanding it down and repainting it. I have painted my tables apple green, turquoise, white and even the predictable but solid brown. I have not gotten brave enough to paint the same piece of furniture multiple colors...it's still too much for me. At least that's what I thought until I came upon this little dresser in my mom's room. Then, on top of the different colors, she goes one step further and adds mirrors. When described, it seems like too much, but honestly, it works...and I LOVE IT! 

A variety of colors and different sizes of mirrors makes this dresser truly unique!

Across the room from the bright dresser sits a small vanity desk. She painted this silver, added fun knobs on the front and then mosaiced part of it in mirrors!!! Then, she added a cute little fluffy bench chair underneath to complete the look. I absolutely ADORE this little table. Silver is a color that can go with nearly anything. Add a little silver paint and some mirrors and you BAM, you have a fun little accent piece to add to almost any room.


Thursday, August 11, 2011

Susan isn't lazy anymore...

First of all, sorry for my lack of entries lately...I have been incredibly busy with life (and doing some amazing creative things...which I will write about later). It's a crazy weekend, but after that, I will be overwhelming the world yet again with some very amazing things!!

Now, to my latest semi-obsession:

I can't help it...I LOVE when objects around the house have funny names. I just LOVE it. Lazy Susan!! Ah, where did this wonderful term come from? I googled this and as we all know, google has the answer to all life's difficult questions:

The lazy Susan is a turntable placed on top of a table, or counter tops, to aid in moving food. It comes in many sizes and shapes, though usually is round, and is made of glass, wood, or plastic. Thomas Jefferson is often attributed as the inventor of the lazy Susan in the 1700s. The term "lazy Susan" actually made its first written appearance in a Vanity Fair advertisement for a "Revolving Server or Lazy Susan" in 1917. Prior to that time they were called dumbwaiters. It is unknown where the term "lazy Susan" came from exactly, but it is highly unlikely to be a reference to an actual person. Some suggest it was common for female servants to be named "Susan" making the name synonymous for a servant, with "lazy" referring to the spinning table not going anywhere. More likely it came from a manufacturer as part of a marketing ploy, with the common name "Susan" used in the same sense that "Tom" is used in "peeping Tom" or "John" in "John Q. Public".
Wherever the name 'Lazy Susan' came from, I am a fan. Since it is only my sweet husband and me, I don't feel the need to have a lazy Susan at our dinning room table...it just seems silly to say "Babe, will you please pass the salt." And, then have them turn the lazy Susan 180 degrees so I can reach it. HOWEVER, this was my thought, until I saw how cute you could make the lazy Susan. My mom (the great one) has a ridiculous huge dinning room table. It can seat ten easily, with room to spare. With a table this large, it is no wonder she always leaves her lazy Susans on the table.

How she did it: She bought a normal plain wooden lazy Susan, bought mosaic tiles and then covered it. VERY simple project, but adding a little tile to anything is always a good idea to make something extra unique.

The table is actually so massive, she has two lazy Susans on it!