Tuesday, December 20, 2011

L.O....E. Wait a minute....

I am blonde. I am constantly multitasking. I am sometimes preoccupied with other things than the task at hand. I am daydreaming about something much bigger than myself that is out there for me! I am getting older every single day. I am a woman. Whatever the reasons are, I am forgetting everything lately!! Anyway...the lesson for this blog is: if you at least start something, you are more likely to finish it than if you never start it at all.

Hmmmm, let me explain that whole first paragraph and introduce ya'll to some yarn art!! Let me take you back to last Friday. It was a rainy little day and I had nothing in the world to accomplish except some errands. Since we live in a smaller town, my errands consisted of an hour-long drive to the 'bigger' town down the road. I adore these days. I cherish my alone time on the way up there and just love looking around all day at some of my favorite stores.

I was in Hobby Lobby (sigh of contentment!) and I had been inspired recently to cover some chipboard letters with yarn. Standing in front of the letters, I was trying to think of what word would look good. "EAT" in the kitchen...hmm, no good...I don't need a reminder to do that. "ALEXANDER" in the hallway...hmm, too long of last name. "SLEEP" above our bed all cutesy-like....nah. "JOY" somewhere in my house....no, this wonderful word reminds me too much of someone I used to know named Joy. "LOVE"....this word can never be overdone. It's perfect! So, I grabbed my chipboard letters and then scooted over to the yarn aisle to buy four of my most favorite colors of blue and green to cover my letters.

I arrived home, got out my recently purchased supplies to start making my project. OH HEAVENS!!! In front of me lay an: L, O and E. I messed up and forgot my V. You can NOT have LOVE without the V!!! I went through the whole array of emotions in literally two seconds (from frustration to humor) and started to work. Part of me wanted to just wait until I had my "V" in hand, because I wanted a finished project. However, I knew that I had the time, energy and gusto to work on my little yarn letters right then, SO I DID.

Have I made it back up to Hobby Lobby yet? No. Did I put up the "LOE" in my hallway already? Yes. Did I have lots of people over to my house to see the "LOE" in my hallway? Ha, yes, I did! But, I figure that if I walk by it everyday, I won't forget to finish this very fun project. So, people, start something, even if you don't have all the stuff to finish it right there!!

Lastly, here's how you do this quick little masterpiece. Buy letters, cut them out yourselves, whatever you would like to do...then get some yarn and just tie a knot in the back to start it and then start wrapping. It takes a few minutes, but it's easy and oh so cute!!!

A closer look at these letters wrapped in yarn...sorry for the HORRIBLE lighting!

I have the letters sitting on a small shelf in my hallway that is surrounded by pictures. The "V" will be a darker teal than the "L" and it will make a lovely little "LOVE." Until then, "LOE" your neighbors!!

Good luck my friends and Merry Christmas!!!

Friday, December 9, 2011

Give me an "A"...or an "a"

Hello blogging world (all sevenish of my friends and family that I encourage to read my blog)....I have been MIA for a bit due to an abundance of projects taking all my time. I was actually going to wait a few more weeks before I started sharing all these ideas again, but I can't wait!! I have the cutest little idea that would be criminal for me NOT to share! AND, my sweet husband often times doesn't notice when I put something new up in the house (because it's an ongoing process that doesn't end)...HOWEVER, he noticed what I'm getting to share with you! This morning when he came to say bye to me at 4-something am, his words were, "I really like that thing you made in the hallway." Me, jumping up that he noticed, instantly awake "Really? What do you like about it?! I like it too...Ooooh, I'm glad you like it." Looking back now, I can see why maybe he doesn't compliment all my projects, ha! SORRY, I digress! Back to this oh-so-fun project!

So, I saw a picture recently of something similar to this (it's not my very own idea, sorry!), and LOVED it. They made a "k" out of all the same exact color of orange buttons and it was super cute. I realized that I should of course make an "a" for our awesomeness and our last name is Alexander...but when exploring my button collection yesterday, I realized all my buttons were different! So, all different buttons (which turned out fabulous I think) is what I used for this little project!!

How I did it: I had an old 8x10 frame that I no longer used, I covered it in batting and then fabric. They didn't have the exact type of fabric I wanted in my small little town, so I cut up an old shirt for the fabric! I got out my staple gun and went to work!! Once the fabric was secured, I just starting putting buttons in the shape of an a. You could draw it out beforehand if you desired, but I didn't. If you were really ambitious, you probably could actually sew any button on. Ummm,I used my handy dandy hot-glue gun! Once I glued them on, I got some white ribbon (I will probably just use solid color light teal ribbon when I buy some) and attached it to the back and hung it up with an over sized push-pin!!

Ahhhh! I just hung it up and just stared at it last night, feeling all creative! It's a quick project that is inexpensive (if you have the buttons). I always see jars of buttons at garage sales for cheap and I always buy those bad boys up! Anyway, I am back little blogging world....be prepared!!


Hanging up in our hallway for all to see.

A close-up view of all my random buttons.

My favorite thing about this button project is the texture of all these BUTTONS!!!

Monday, November 14, 2011

I will return!

I am busy with so many holiday parties, to-dos and this and that...I will return to my blogging world after Christmas!! :) I promise...until then, craft on sweet friends!!

Monday, October 17, 2011

If you're going to eat it...make it look good at least!

Hello world!!!! This is still my blog...don't let the following entry about food fool you. I am still here tearing apart furniture and messing with paper. I just side-stepped into the world of food for a minute...anyway, here we go:

The one thing that I am an advocate of more than almost anything else is design. The world is just a happier place when things look aesthetically pleasing. Food for instance. It may taste good, but if does not look good, no one is going to eat it. Case in point: we dye nearly every processed food we eat to make it look 'better.' I have been the host to a number of small little parties lately, from celebrating Air Force milestones to baby showers. I am not the best cook in the world (far from it) and when food needs to be made for these celebrations, I panic!! However, using some shot glasses, I have found a creative way to make food look better...therefore hopefully making it taste even better!!! :)

If you have small containers or votive candle holders or shot glasses, this type of layering dessert/food will work perfectly! You will need mini spoons to fit in these containers, which you can order online (I ordered espresso spoons) or find in a speciality shoppe.

The picture below is of a recent baby shower (where my friend Meredith...the AMAZING cook filled these, so not only where they pretty, but they tasted good too!!) with a line of delicious yogurt layered parfaits. I have used these shot glasses over and over, so they really are a wise investment!

For parties in the past, these shot glasses were used with such foods as: banana pudding (pudding, vanilla wafers and fresh banana layers), turtles (brownies, pecans and caramel), chocolate raspberry heaven (chocolate pudding, fresh raspberries and brownie chunks) and angel food cake (chunks of cake, fresh strawberries and blueberries and whip cream). The possibilities are endless!!


I just wanted to quickly highlight a way to make even average food look amazing!! PLUS, these little shot glass desserts are a hit at parties. Good luck friends!!!

Tuesday, September 27, 2011

Simple and Cheap...

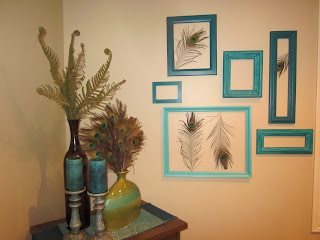
Hello world...I have been MIA, because I have had some fun-crazy stuff happening lately....SO here I am!! Anyway, now to the blog: When living in an apartment (and NOT allowed to paint the walls), one must come up with creative ways to fill the wall space. It must be simple, cheap and most importantly fill a lot of this empty space on the wall!!!

Low and behold...the project below for under $20!! (the stuff on the wall...please ignore the stuff on the table).

I high-lighted this briefly before, but people have requested I give a quick how-to.
I bought six random size frames at my favorite local thrift store, went to Lowes and bought those itty bitty sample paints (I bought them in two colors, one light aqua and one dark aqua. They are behind the paint counter and around $2 a piece) and then I bought four peacock feathers from a craft store. I took the glass out of the frames, sanded them down lightly (so the paint sticks better), then painted them random shades between my light aqua and dark aqua. I hung them on the wall (a level is key here, unless you have a perfect eye!)...and then added the peacock feathers afterwards...I just added them by taping them to the back edge of the frames. KEY: I laid this little collage out on the floor first to figure out where I wanted each frame to save my wall from multiple holes.

Lastly, you can use anything...not just peacock feathers.
Good luck and hopefully you have a bare little wall, this might be an idea for you!!


This is in my dinning room and adds the perfect detail to an otherwise blank wall.

Tuesday, September 13, 2011

My sister's favorite thing...

I've highlighted my dear sweet sister's creativity before, but here is yet another example of her being creative! A little background that seems necessary on my sister. She's obsessed with pens. YES, pens! It seems odd to the average person, but if you knew how much this girl writes, grades college papers, doodles...you could then maybe understand her love for the pen. In her house, she has an entire drawer (not a little drawer mind you) saved for her pens. So, you get the picture, she likes pens.

NOW while I am on the subject of pens...I am sure that almost all of you have seen those pens with big flowers or sometimes a random spoon on them at banks, grocery stores, etc. It took me a while to figure why these were necessary, but it's so people won't keep taking these pens that belong to these businesses. My sister, loving pens as she does, clearly took note of this and thought of this brilliant idea!!

My parents never have pens laying around then they need one (to take a message when someone calls, etc), so my sister made them an adorable little container of flowers that matches their kitchen PERFECTLY that are actually pens!!! YAY! What a perfect little idea that I wanted to share.

You notice a cute little pot of flowers on the counter...never do you think it's actually pens!! WOW! LOVE IT!!

Best thing about these flower-pens is they are very cute flowers, not cheesy lookin ones!

I just LOVE it!!

Thursday, September 1, 2011

Handmade gifts. From: Shena


For my mom's birthday a couple weeks ago, I made her a handmade frame. I know what you are thinking, does your poor family get anything actually bought from you?! Ummmm, yes, they do! HOWEVER, I like to make them things!

AND, as you may or may not know, I have a thing for flowers. No matter what type of project I am working on, I always try to add a flower to make it more 'me.' A few months ago, I saw a 'how-to' on making fabric flowers by cutting circles out of fabric and then burning the edges (silk-based fabric), so of course I tried this. I tweaked this process a little bit and I absolutely LOVE what I came up with.

Anyway, I only took a picture of this frame on my horrible little cell-phone camera, so pardon the HORRIBLE quality of the picture. You can get the idea though. Soon (October), me and two of my good friends are going to 'teach' a class to a bunch of Air Force spouses about making these frames, so I will whip up many more examples and have some much better pictures.

What I did: bought a wood frame from Wal-Mart (for 2.97...but Hobby Lobby also has wood frames for 1.00...however, I live an hour from Hobby Lobby, so you see my dilemna!), glued a piece of scrapbook 12x12 paper on to the frame...cut to fit, sanded down the edges to give it a worn look, then stained the edged with my dauber (see previous entry for my going-ons about the dauber), then attached these FABULOUS silked burned flowers I made and added a few little pearls in the flowers and in the corners of the frame....and waaalaaa: homemade birthday present frame done!!!


You can do all sorts of fun things with these cheap frames to personalize them. Hope this gives you some ideas!!

Wednesday, August 31, 2011

Mountain artwork!!

I went up to the mountains last week for a family reunion...and it was fabulous. Literally, AMAZING!!! My extended family is about as amazing as they come. They are kind, loving, hilarious, encouraging and just good at life!! And, it was a nice little creative escape. I came back feeling refreshed and full of good ideas! (my family is amazingly creative as well, so always good to be inspired by them).

Anyway, I just want to quickly show you the most amazing piece of artwork EVER!!! The great one (my mom) went up to this mountain oasis this last winter to help my uncle and aunt decorate their home. When she was up there, I talked to her on the phone and she was sharing with me this artwork that she created. I listened, but honestly, didn't 'get it.' It sounded like a big blob on the wall. As she described it more and more, the more confused I became. I completely forgot about this artwork until this weekend. I was looking around at my awesome auntie's mountain home and saw this art on the wall...complimented them and she informed me they were made by my mom. Am I surprised? No!!! Anyway, completely amazing!!!

She got pieces of plywood, covered them in faux-leather pieces. Put little mosaic pieces of tile and cut part of the sides away to make it look like natural ('riverish'), added grout...then went and chopped down trees (not kidding) and tied them to the artwork. Look below to see amazingness!!

And, if that weren't cool enough, look what is beyond the artwork (in the last picture). SERIOUSLY, could this get any cooler?!


This huge incredible artwork just make this hall-way something special.


AND...OH MY AMAZING!!!! Behind one of the pieces, is a hidden room. It's a door!! WOW!

Tuesday, August 23, 2011

No thank you, I'll make that myself!

Have you ever walked into a store and absolutely loved something? I mean, you see it across the store and ahhh, your heart skips a beat...you just know that that object is meant to be in your home!! THEN, you see the price tag...and the love for this used-to-be-amazing-object vanishes and you can't believe the nerve that someone would actually charge that much for something! Yep, I have been there! I always say to myself, "NOOO thank yoooou, I will be making that myself!" By the time I actually purchase all the equipment and tools to make these home-made objects, it probably ends up costing the same, but it's the concept!

Anyway, back a few years ago, I spent a good solid week in my hometown, doing absolutely nothing but helping mom with her projects. It was the perfect therapy for me! She had ideas, I had ideas...but mainly she had the ideas and I had the labor! She wanted to replace the shutters on the outside of her house. We went to one of my favorite stores (Lowes....don't judge me, the store is AMAZING) and looked at shutters...whew, EXPENSIVE! So, we decided with authority and confidence that we could make em...so that's what we did.

We bought pieces of wood, cut them to the size she wanted (they could do that for you at Lowes, but she has her own power saw, so she did it herself...obviously), painted them the perfect color of grey-brown and then attached these awesome over-sized hinges that she had bought...then placed them beside the windows for some picture-perfect shutters! Every time I am lucky enough to go back to my home sweet hometown, I see these amazing shutters and feel a sense of pride because we made that ourselves!


Monday, August 22, 2011

Tag, you're it.

Ha, I am still giggling on the inside of my creative little title of this entry. So, I'm going to talk about tags today. I like them. I love how you can go into a store and right beside the gift-wrapping is all sorts of little matching tags. Ah, glorious! But, if I ever see something in a store that I like...well, you best be believing that I think I can create it! So, this little entry is about some homemade tags...well, kinda. Some of my friends here in Mississippi have been inside my 'craft closet' and seen my boxes and boxes of home-made tags I have made, just waiting to go on presents someday. I have issues people! I create things by the masses...seriously! I don't just make one really cute tag, I make thirty of the same one. People think I am kidding, I am not. If you have ever read "my intro" to this blog, you will understand, that working with my hands is my therapy...so if I'm in a 'mood,' I generally can be found hunched over working on something. And, then I go overboard and make thirty of the same thing. SO...wow, long rabbit-trail there, but my point is: this entry is NOT about all those tags, but one other tag in particular. Whew!

Anyway, for me and my favorite's wedding reception, we had the task of assigning people to particular tables for dinner. For all those who have had weddings, I am sure this is a task you might not have relished. I LOVED IT! I could not wait to make these fun little place cards and tell people where they were to sit....maybe it's the bossiness in me! Either way, I decided to make our place-cards into 'place-tags.' Our colors were black, white and that fun little apple green, so that is the colors I used. What should tags be hung from? Well, a home-made mini-tree of course!

What I did and how I did it: I bought some manzinta branches at a local whole-sale flower shop, zip-tied them together (zip-ties are AMAZING...and if you have never used them, I insist that you try someday) and spray painted them black. Bought a little bucket-of-a-thing to put them in, mixed up some concrete to pour in the bucket and hold the branches into place. I then covered the concrete up with some moss. As for the tags: I cut them out to the size I wanted, cut out the numbers as well (by cut, I mean use the amazing cricut that cuts anything I want for me), bought a white-pen so I could write on the black tag and there you go! Then, I got green and black sheer ribbon to hang them with and waaaLaaa, place-tags done! I am sure the pictures will explain this MUCH better than I am attempting to.

I don't know if I will ever throw a party in the future that will require place-cards, but if so, I will have my tag idea ready to go!!


A far-away view of the tree with the 'place-tags' hanging from it. I will try to find a better picture!

An up-close view of the tags.

And, mad props go to my sweet, sweet husband for assisting me with the creation of the tree...he doesn't always see my vision when I explain it, but he's always there supporting it!

Thursday, August 18, 2011

DIY...and DIY quickly!

Okay, I admit it...I have a problem. I start things and have trouble finishing them. For instance, I have been working on the same oil painting for almost a year now. UGH! I like details and enjoy even more taking my time working on details. I am able to do this, because let's face it, I have nothing else to do with my time. BUT, just because you have the time to work FOREVER on a DIY-project doesn't always mean you have to. It's often times the most rewarding to have a project done quickly to show off the creation you just made!! Let me share with you a very quick and AH-amazing paint project!

If you haven't noticed, I am still highlighting some of my mom's projects. I have stacks of things of my own to share with the world, but thought her ideas are just too great to wait!! In the basement of my parent's home is where you could almost always find someone. It's a great hangout place! It has a big screen, recliner chairs in a row, a fireplace and a pool table. It's the place to be in this amazing house!!

Along the walls sits five rectangular pieces of black metal. (You could also use canvas) From afar, you see lines of fall-foliage-colored trees. Up close, you see paint dripping and the brush-blots. I LOVE IT!!!! What the great one did: lined up the canvas/metal in a straight row, stood them tilted on the ground (so the paint would drip), put a little dab of paint on each one so the dripping would begin, then just blotted the bristles of the brush to create the tops of the trees. See below. It's a stunning piece that sits along the wall of the basement. AND, the very best thing about this project is: it's fast!!!


The view from across the room of this amazing DIY artwork!

Wednesday, August 17, 2011

Mirror, Mirror, on the...furniture?!

First and foremost, I apologize for the quality of pictures that you will see in this entry...as well as the possible messiness that is in the background. I was rushing taking these pictures and did not take the time they deserved. Sorries!!

So, "Shabby Chic" is all the rage right now. It's adorable, but it seems like EVERYONE is doing it. So...you have an old piece of furniture that you want to redo and you are not really a shabby chic type person. What is one to do!? One possible solution is to add mirrors!

I am a huge fan of finding old furniture and sanding it down and repainting it. I have painted my tables apple green, turquoise, white and even the predictable but solid brown. I have not gotten brave enough to paint the same piece of furniture multiple colors...it's still too much for me. At least that's what I thought until I came upon this little dresser in my mom's room. Then, on top of the different colors, she goes one step further and adds mirrors. When described, it seems like too much, but honestly, it works...and I LOVE IT! 

A variety of colors and different sizes of mirrors makes this dresser truly unique!

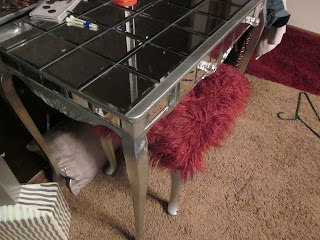
Across the room from the bright dresser sits a small vanity desk. She painted this silver, added fun knobs on the front and then mosaiced part of it in mirrors!!! Then, she added a cute little fluffy bench chair underneath to complete the look. I absolutely ADORE this little table. Silver is a color that can go with nearly anything. Add a little silver paint and some mirrors and you BAM, you have a fun little accent piece to add to almost any room.


Thursday, August 11, 2011

Susan isn't lazy anymore...

First of all, sorry for my lack of entries lately...I have been incredibly busy with life (and doing some amazing creative things...which I will write about later). It's a crazy weekend, but after that, I will be overwhelming the world yet again with some very amazing things!!

Now, to my latest semi-obsession:

I can't help it...I LOVE when objects around the house have funny names. I just LOVE it. Lazy Susan!! Ah, where did this wonderful term come from? I googled this and as we all know, google has the answer to all life's difficult questions:

The lazy Susan is a turntable placed on top of a table, or counter tops, to aid in moving food. It comes in many sizes and shapes, though usually is round, and is made of glass, wood, or plastic. Thomas Jefferson is often attributed as the inventor of the lazy Susan in the 1700s. The term "lazy Susan" actually made its first written appearance in a Vanity Fair advertisement for a "Revolving Server or Lazy Susan" in 1917. Prior to that time they were called dumbwaiters. It is unknown where the term "lazy Susan" came from exactly, but it is highly unlikely to be a reference to an actual person. Some suggest it was common for female servants to be named "Susan" making the name synonymous for a servant, with "lazy" referring to the spinning table not going anywhere. More likely it came from a manufacturer as part of a marketing ploy, with the common name "Susan" used in the same sense that "Tom" is used in "peeping Tom" or "John" in "John Q. Public".
Wherever the name 'Lazy Susan' came from, I am a fan. Since it is only my sweet husband and me, I don't feel the need to have a lazy Susan at our dinning room table...it just seems silly to say "Babe, will you please pass the salt." And, then have them turn the lazy Susan 180 degrees so I can reach it. HOWEVER, this was my thought, until I saw how cute you could make the lazy Susan. My mom (the great one) has a ridiculous huge dinning room table. It can seat ten easily, with room to spare. With a table this large, it is no wonder she always leaves her lazy Susans on the table.

How she did it: She bought a normal plain wooden lazy Susan, bought mosaic tiles and then covered it. VERY simple project, but adding a little tile to anything is always a good idea to make something extra unique.

The table is actually so massive, she has two lazy Susans on it!


Monday, July 25, 2011

Smart, yes. Creative too.

Whenever I have a style question, I go to my sister. Whenever I have a funny story, I go to my sister. Whenever, I have a creative idea, I go to my sister and run it by her. Seriously, she's my go-to. Many people think I am the 'creative one' and she is the 'smart one.' While, she may indeed be the smarter one, she is also very creative. I keep pestering her to share some of her creativity with the world, but she has a full-time job, two kids and lately, a fun little love life...so, please prepare yourself world to be wowed by Brooksie Lane and some of her creative ideas this week (high-lighted by her sister with no kids, no full-time job but a wonderful love life)!!

Brooksie Lane has a great love for a few things in life: family, books, pens, games and jewelry. Yes, I said pens. I will highlight this love later! Anyway, growing up in the middle of the Missouri, us Springfieldians aren't always on the cutting edge of fashion (well, I'm not!). Buying fun jewelry in Springfield consists of going to Macy's, Dillard's or another store in the mall and trying to find something you like. After a while, there is only so much you can do....SO, what does my creative sister do?!? MAKE HER OWN!

I am just showing off one of her amazing necklaces that I think is amazing!! When I asked her how she did it, she said, "I don't know, I just kept making it until I liked the way it looked." For those of you who have never made anything hand-made, that is the secret...honestly! Make it until you like the way it looks. Chances are, if you like it, others will too!!


Yep, I love it! It reminds me of Betsy Johnson, only better!

Sunday, July 24, 2011

Exercise always leads to food...always.

When we first moved to dear sweet Columbus almost a year ago, I had no friends...so I needed something to do with all my time. I started running. I know, I know...I probably could have found something more productive to do with my time, but running was what it was. I am half-way through with my 2011 New Year's Resolution of running one half marathon every month. When one runs as much as I have this year, one has plenty of things to think about. I often find myself brainstorming about reasons to throw a party...then, naturally this thought process takes me to how I can decorate for this party....what flowers I would use, the color scheme, the music and of course the food I'd have at this party! It's amazing how I can be in the middle of running 13.1 miles and my mind almost always ends up reflecting the topic of food. Hmmm.

Anyway, I am not a cook or a chef or a baker, but I try. Most everyone who reads my humble little blog knows I used to be a party planner for a bunch of big-wigs in Palm Beach. If I were to throw a party here in my dear sweet Mississippi, I probably wouldn't have the budget of a Palm Beacher...nor would I have the access to the variety of flowers or linens or anything along those lines. BUT, what I do have is food. Yes, finally, Mississippi being the fattest state in the union (I am not kidding about this fact) is paying off!

While creating amazing food is indeed a talent, I am not highlighting that talent right now. Instead, I just wanted to show one very fun way that food can be used in a centerpiece for a party! You have a beautiful arrangement of flowers at the top of a vase or container and the only thing at people's eye level?!?! GLASS! Not the most exciting thing in the world, no matter how clean and sparkly the glass is. A lot of people fill the glass with water and a little something extra....and it's a good look, don't get me wrong. HOWEVER, my favorite thing to fill a container with is food! You know my thoughts: Crafting (food in a vase is crafting in my eyes) always trumps cooking.

Anyway, below are some pictures of parties I have done in the past where food makes a statement.

Lemons and limes.


All sorts of fun fruit in this vase!!

It's not to fill the vase, but rather the whole focal point of the vase...kumkwats!

My dear friend just got married and had a beautiful wedding with purples and green being their colors. I helped out with their cocktail centerpieces and she wanted limes used somewhere. SO, even for a smaller container, fruit can be used!!

A carnival-themed party, so a vase filled with peppermints!

Thursday, July 14, 2011

Back to the Most Creative House in the World...

I have taken a few days off from sharing ideas from my parent's house. I didn't want to overwhelm you with all the good home-decorating ideas at once, so I am spreading the creativity out! Now, back to the home:

I am high-lighting something very small today, but it warms my heart like nothing else...it's seriously amazing! Please glance at the picture below and what catches your eye most?


Yes, you might say the coke bottle (I took a picture in the middle of us eating dinner when I was visiting, so pardon any mess you see...It's my fault!). Or you might say the tile wall that she helped design herself. Or you might say the fresh looking cabinets, which she redid and painted herself. You might even say the turquoise/aqua painted back splashes in the openings in the cabinets. But, my focus right now is of the rectangle art at the top of the wall. I am so mad at myself for not taking a picture of this same exact room when the lights were off, because it would just blow your mind...SERIOUSLY!

Here is a close-up:


You might be thinking, what does that say? It says "Love always protects." Around the top of my parent's kitchen on pieces of leather (left-over from the leather wall in the bedroom, I am sure) are embroidered verses from 1 Corinthians 13...and they are embroidered in GLOW IN THE DARK THREAD!! Oh my amazing! We always need reminders of what the Bible says...especially when it is the darkest. Even if these didn't glow in the dark, they would still be fabulous...but they DO, so wowzers!

Morals of this creative little lesson: 1. Put God's word everywhere. I mean, really, can you ever go wrong with that? 2. Save your left-overs from other projects, because you will find another use for them, I promise! 3. If there is a spot on the wall that is bare, even if it's small, you can put something creative and unique there!


Tuesday, July 12, 2011

Can't spell, but I can write!

I am a bad speller. I use grammar wrong constantly. I have no idea what a preposition (Yes, I just googled the word 'preposition' to make sure it was indeed the thing I have no idea what it is) is still to this day. I have to think really hard when I play Mad Libs to and they ask for a particular part of the English language. To put it very bluntly, I am bad at English. HOWEVER, I love to write!!! No, no, no...not write books or poems or short stories or anything along those lines. I like (let's be honest, LOVE) to write letters. It brings me great joy to think that in a few short days someone will be sorting through a stack of bills or junk mail...and then, suddenly, they spot something written by an actual human. They see this envelop and they think....hmmm, maybe someone is getting married or graduated. Then, they open up the envelop and see that it is just a good old fashion letter from me!

When I have a lot to 'say,' I use notebook paper (college-ruled of course). When I just would like to say a quick 'hello and I love you,' I use a homemade card. When I want to wow their socks off, I use some of my homemade stationary! (I just learned how to make this INCREDIBLE stationary last week, so people who get regular letters from me, please prepare yourselves for your socks to be wowed soon).

Okay, while I will someday highlight cards and this to-die-for-stationary, the subject of this particular post is about the envelope. In my humble opinion...wait a minute....I take that back. My opinion in this matter is not humble. I keep the post office in business with my constant stamp-buying (these stamps are going up at ridiculous rates)...Therefore, in my non-humble opinion, I think the envelope is one of the most under-valued objects of American culture. There is not the proper respect given to the envelope as it deserves.

The envelope is to the letter as your makeup and outfit is to you: VERY IMPORTANT! While I hope you understand the importance of what I am saying here, please notice with equal awe of the simile (a comparison using like or as) I just used! Anyway....This is the first thing people see and it sets the whole mood of the letter. I may have some serious issues here, but come on people, give the envelope some respect. One might be thinking, how many ways could there possibly be to address an envelope? OH....let me show you! Some ideas below of some fun and creative ways you can make your envelope as special as the letter you are about to send. And....please if you aren't a "letter-writer," try it...you'll be shocked how much joy your insides will feel.
Write the person(s) name larger and in a pretty font. I covered up their address, to protect their privacy...and I already had this envelope ready to mail!

You can make the address into a simple shape, such as this butterfly!

Sometimes it is just fun to write in a bright color and make it very over sized, almost taking up the entire front of the envelope...I'm sure the mailman appreciates my extra large writing on this style!

It always adds such a special touch to make one letter extra big, more detailed and different than the rest!


One of my favorite ways to address letters...it is completely unique! The person's name goes on top and bottom, with the address in the middle in between two thick lines (use a ruler if you need).

If you are curious by now, Omega is my grandma and she gets letters weekly! A fun way to address the envelope is use different colors, curve the name, off-center the address and use different styles of hand-writing!

If you are going to just address the envelope like normal, you can always add a little flair on each letter
with hash-marks and indent each line.

You can put the name sideways in a different color for an added pop!

My favorite paper store of all time. Every color, every size, every weight of paper and envelopes you can imagine. It's literally like envelope-heaven on earth. I am sad to say that they used to know me by name in this store. If you live by an Xpedx, visit this store!!

There are so many ways someone can spice up an envelope, so be creative! I hope these gave you a few ideas. I will be back to sharing the creativity of my parent's home later this week...prepare yourselves to continue to be awed!

Thursday, July 7, 2011

Cooking? Only if it's out of a scrapbook!

Cooking is almost like crafting. ALMOST. You work with your hands, create lovely things and get to enjoy the finished product after you are done. However, cooking has some pitfalls that crafting does not....which is why at the end of the day, I choose crafting! When you are finished doing a scrapbook page or painting a frame, you can just throw away your scraps, drop cloth and be done with it. BUT, cooking....ahhhh! You cook for a bit and you have to clean a hundred little tiny things when you are done. You have to make sure you don't leave any extra food out, because if you do, you will smell something rotten in a couple days. Even if you cook something AMAZING, you only get to enjoy it a few times. You spend all that time cooking and then 'poof,' your husband gets home and the food is gone. You spend time crafting, and you get to enjoy it FOREVER!

I realize that my logic might possibly be a little skewed, but nonetheless, it is where my opinion stays: crafting will always trump cooking. However, since cooking is a must for this stay-at-home-part-of-the-time-wife, I have turned my cookbook into something worthwhile! A cookbook scrapbook. 

This idea is NOT my own, but I love it! My aunts (years ago) put all our family recipes into a 5x7 cookbook and decorated each page. I, of course, had to be part of this project! As time has gone on and many more recipes have made it into my arsenal of cooking, I have added on to this cookbook. Last night in fact, I could not sleep, so got out some new recipes of mine, typed them into the computer, printed them out, cut them to a 5x7 size, decorated each little 'page' and then found them a special spot in my cookbook.

How to do it: type up your recipe (set the page margins what your cookbook scrapbook will be), print it out in easily readable but CUTE font...colors are good too, cut the page to size, add simple border to the page (You will be SHOCKED how many random boarder stickers you might have!), then add some fun stickers or embellishments to the page. WaaLaa, done!
If you are not a scrapbooker, or just learning how to scrapbook, this is the PERFECT project, because it is very quick and you can make it as complex or as simple as you would like. And, then, when you finally do decide to cook, it will just warm your heart that at least something in your kitchen will last forever....well, at least longer than your food!


Where my recipe book sits open in my kitchen next to all my other "regular" cookbooks.